Server Administration Application – Configuring Email
Accounts
Direct
Connection to Email Server
Verj.io
Gateway Connection to Email Server
Domain
Keys Identified Mail (DKIM)
Generating DKIM Public and Private Keys
See also: Server Administration Application Home Page, Working with Email
Introduction
Email accounts are created and maintained on the server using the Server Administration web application. They are saved in folder emailAccounts in the ebaseConf folder of the web application e.g. userdata/apps/<webappname>/ebaseConf/emailAccounts. These files can be copied between servers if required.
An email account represents a connection to a specific email server, optionally including an authenticating user name and password. Each Email Resource, which represents an email message, is then connected with an email account.
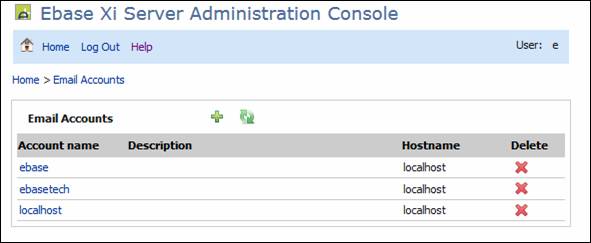
- Click
the
 icon to create a new email account
 - Click
the
 icon to refresh the display
 - Click
the
 icon to delete an email account
 - Click on an email account name to display or edit its properties
- Click Help on the menu at the top of the panel to display this help page
Email Account Properties
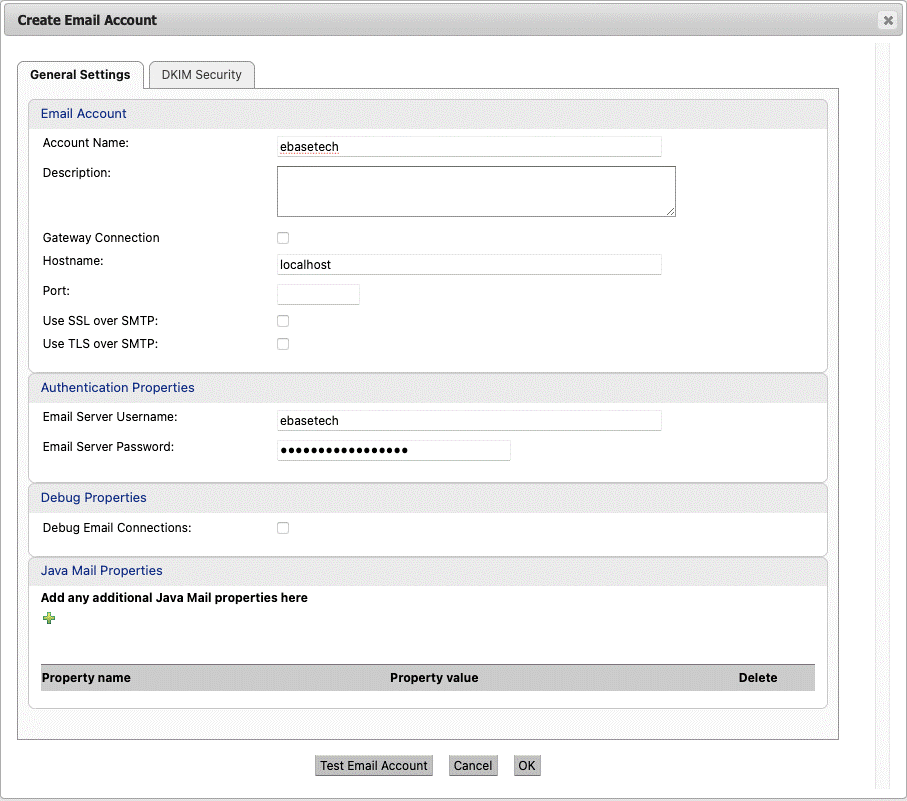
Email Account
Direct Connection to Email Server
|
Account Name |
Email account name. |
|
Description |
An optional description. |
|
Gateway Connection |
Leave unchecked to configure a direct connection to the email server. |
|
Hostname |
Specifies the hostname or IP address of the email server. |
|
Port |
The email server port. If not specified, the default port depends on whether SSL is configured: the default port without SSL is 25, with SSL 465. |
|
Use SSL over SMTP |
Check this property to activate the use of SSL to encrypt all email messages. In most cases there is no need to import a certificate. However, when the server’s certificate is "self-signed”, the server's certificate must then be imported into the server’s keystore file. Alternatively, property mail.smtp.ssl.trust can be added to the Java Mail Properties section below with the email server host name e.g. mail.smtp.ssl.trust=servername |
|
Use TLS over SMTP |
TLS is an alternative to SSL that prevents an email message being “sniffed” during transmission. In most cases there is no need to import a certificate. However, when the server’s certificate is "self-signed”, the server's certificate must then be imported into the server’s keystore file. Alternatively, property mail.smtp.ssl.trust can be added to the Java Mail Properties section below with the email server host name e.g. mail.smtp.ssl.trust=servername |
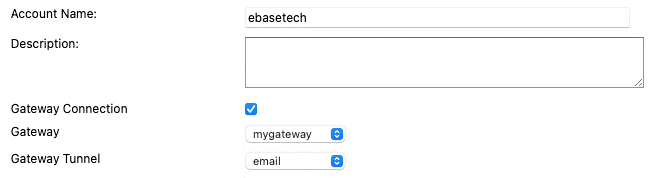
Verj.io Gateway Connection to Email Server
To communicate with an email server over a Verj.io Gateway Tunnel check the Gateway Connection check box. The configuration options then change accordingly.
|
Account Name |
Email account name. |
|
Description |
An optional description. |
|
Gateway Connection |
Check to configure a Verj.io Gateway Tunnel to use to
connect to the email server. |
|
Gateway |
The name of the Verj.io Gateway to use. Verj.io Gateways
are configured on the Gateway
Connections page. |
|
Gateway Tunnel |
The name of the Verj.io Gateway Tunnel to use. Only currently
connected Gateway Tunnels can be selected. See the Gateway Connections page
for more details. |
Authentication Properties
|
Email Server Username |
Specifies the account name for the email server. This property is optional. |
|
Email Server Password |
Specifies the password for the email server. This property is optional. |
Debug Properties
|
Debug Email Connections |
When checked, additional debugging information about the connection is written to the server log. |
Java Mail Properties
The properties that can be configured in the sections above are the email properties most commonly used, however any additional properties supported by the javamail API can also be configured by adding them in this section. The Verj.io email implementation always uses the SMTP protocol so only properties pertaining to this protocol will be effective.
Domain Keys Identified Mail (DKIM)
Introduction
Domain Keys Identified Mail (DKIM) allows the sender of an email to associate a domain name with an email message. This is then authenticated and vouches for its authenticity.
To create a DKIM message the sender must sign the message using a digital signature. The signature is sent as part of the message and is contained within the message header. The message is signed with a private key. The public key for the signature is stored on the domain of the sending email address e.g for the email mymail@example.com the public key is stored on the domain example.com.
If the email is authenticated then the email can be trusted and it much less likely that the email will be flagged for spam email. If the email cannot be verified then the email is much more likely to be marked as spam.
Domain Configuration
In order to use DKIM it is required that a DKIM TXT record is configured on the domain server. This is configured as a sub domain. Each server may have slightly different configuration steps but they should allow you to:
1. Create a selector. This is a simple user defined string that is associated with the public key. This is used in the DKIM header to identify the selector to use.
2. Store the public key for the DKIM digital signature. Some servers allow you to generate the public/private keys on the server that can be used for the DKIM digital signature.
3. Publish the selector and public key in a DKIM TXT record.
Go to the domain server and add a new TXT record and configure the following properties:
·
Host name:
Enter the
selector text string followed by the literal string ._domainkey. For example, if
you use default as the text string, you would enter default._domainkey.
· Text: Add the following text to the Text section v=DKIM1; p=<public-key>
e.g v=DKIM1;
p=MIGfMA0GCSqGSIb3DQEBAQUAA4GNADCBiQKBgQDA5tPeeM4CysR+VEfwQKKS9eImed5nfD2VDdaxs09JxWI6N881ddlHfWHkoF7plxnXBuxVvKIowktDTKXDs8B/HyFAhaYGror+RI+N++Icdq6/TeeuW66vc5lC1kVvF6c3Kr3qM/E8BDpOyD2cm+kd22AJxP0/q5IctNDB3OOr9QIDAQABield
If the above settings
are applied to example.com domain name, the following DKIM record will be
created:
default._domainkey.example.com
v=DKIM1; p=MIGfMA0GCSqGSIb3DQEBAQUAA4GNADCBiQKBgQDA5tPeeM4CysR+VEfwQKKS9eImed5nfD2VDdaxs09JxWI6N881ddlHfWHkoF7plxnXBuxVvKIowktDTKXDs8B/HyFAhaYGror+RI+N++Icdq6/TeeuW66vc5lC1kVvF6c3Kr3qM/E8BDpOyD2cm+kd22AJxP0/q5IctNDB3OOr9QIDAQABield
v=DKIM1
DKIM Canonicalization
Canonicalization is a process in which the headers and body of an email
are converted to a canonical standard before it is signed. Some email systems
modify emails when they are sent and this can invalidate DKIM. Some mail
signers allow minor modifications to the email whereas some are much stricter
and do not allow any modification.
The two canonicalization
algorithms created to satisfy modification of email are relaxed or simple.
·
Relaxed – Allows
minor modification of an email message
·
Simple – Does not allow
any modification of an email message
The headers and body of the message specify the canonicalization algorithm separately for DKIM to allow
flexibility between the two. This is because headers are sometimes modified
from some email servers.
Configure DKIM for Email

To configure the server to use DKIM for sending email,
open the Email Account to configure
and select the DKIM Security tab.
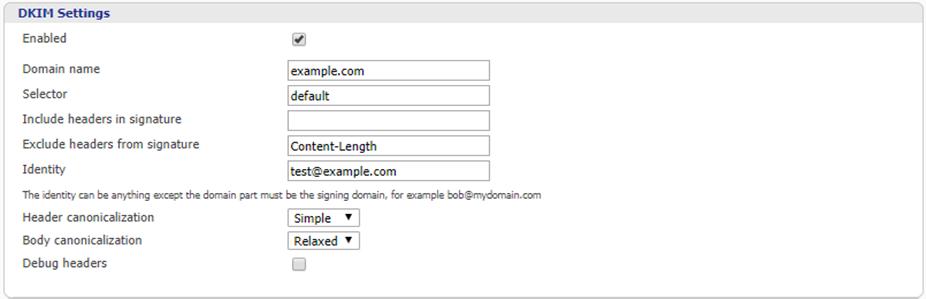
DKIM
Properties
|
Enabled |
Tick the enabled checkbox to enable DKIM |
|
Domain name |
The domain name that has DKIM configured. |
|
Selector |
The name of the DKIM selector configured on the domain server. |
|
Include headers in signature |
A comma separated list of any additional headers that should be included as part of the digital signature. The default headers included are: Content-Description, Content-ID,
Content-Type, Content-Transfer-Encoding, Cc, Date, From, In-Reply-To,
List-Subscribe, List-Post, List-Owner, List-Id, List-Archive, List-Help,
List-Unsubscribe, MIME-Version, Message-ID, Resent-Sender, Resent-Cc,
Resent-Date, Resent-To,Reply-To, References,
Resent-Message-ID, Resent-From, Sender, Subject, To |
|
Exclude headers from signature |
A comma separated list of any headers not to be used as part of the digital signature. |
|
Identity |
This can be anything but it must be an email address with the same domain name configured as the Domain name above. |
|
Header canonicalization |
Can be one of Simple or Relaxed. See canonicalization for more details. |
|
Body canonicalization |
Can be one of Simple or Relaxed. See canonicalization for more details. |
|
Debug headers |
Prints out the headers into the console log to show the DKIM headers. |
Verifying
DKIM
The following tools can be used to verify your DKIM
settings once the domain and Email Account are configured:
·
http://dkimvalidator.com/ - This site
allows you to send an email to a temporary email address and verify your DKIM
headers and digital signature.
·
https://mxtoolbox.com/dkim.aspx -
Another site that verifies email delivery to a temporary email address.
Generating
DKIM Public and Private Keys
There are several tools available online to generate
public and private keys for DKIM.
·
https://dkimcore.org/tools/keys.html
·
https://www.dnswatch.info/dkim/create-dns-record
·
https://support.google.com/a/answer/174124?hl=en
Open SSL Key Generation
The following link shows instructions on how to generate
DKIM keys using SSL https://lxadm.com/Generating_DKIM_key_with_openssl
Gmail DKIM Verification
It is possible to verify that the DKIM signature is OK by
sending an email to a valid Gmail account.
1) Send an email to a valid Gmail
account
2) Open Gmail
3) Open the email and next to the senders name click the
Drop arrow.
4) The message is authenticated if you see:
·
Mailed by: header
with the domain e.g example.com
·
Signed by: header
with the sending domain.
The message is not authenticated if there is a question
mark next to the sender’s name.