Gateway
Tunnels
See also: Verj.io Gateway, Gateway REST Services, Gateway Configuration
Introduction
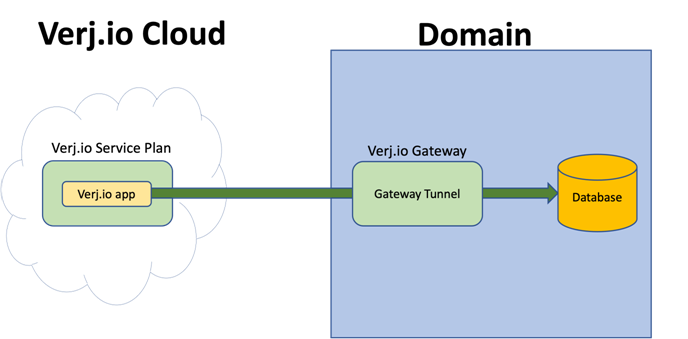
Gateway Tunnels can be configured in Verj.io Gateway to give remote Verj.io Applications running on trusted Verj.io On-Premises environments and Verj.io Service Plans access to databases and services that would otherwise be inaccessible outside of the private network.
Gateway Tunnels work with any TCP/IP application or service that can be accessed by specifying a hostname and port number, including: Databases, Email, LDAP, HTTP(s), REST, SOAP and FTP services.
Configuring Gateway Tunnels
Tunnels are configured in the Gateway Configuration page of the Gateway’s Server Admin Application.
Click on the + button to add a new Gateway Tunnel and specify:
- name - used to identify this Tunnel on remote Verj.io On-Premises environments and Verj.io Service Plans.
- hostname - the host name or IP address of the server this Tunnel should connect to, e.g. the hostname of a Database server.
- port - the port number of the resource on the host server, e.g. the port number the Database is listening on.
- SSL – check this if the resource has been configured to be secure and requires a SSL/TLS handshake.
Note that for the Verj.io Gateway to successfully connect to a secured resource, the appropriate TLS certificate may need to be added to the Gateway’s trust store. This is most likely if the resource has been secured using self-signed certificates.
Each resource you want to access from a remote Verj.io Application requires its own Gateway Tunnel.
Connecting to Gateway Tunnels
The Gateway Connections section of Verj.io On-Premises environments and Verj.io Service Plan’s Server Admin Application is used to connect them to Gateway Tunnels.
In this section, available Gateway Tunnels are listed for each configured Verj.io Gateway. Before a Tunnel can be used, it must be connected to by checking that Tunnel’s Connect checkbox.
Should the Verj.io On-Premises environment or Verj.io Service Plan be restarted, it will automatically reconnect to all the previously connected Tunnels.
Using a Gateway Tunnel
Broadly specking, using a Gateway Tunnel in a remote Verj.io Application is the same connecting to the resource directly. The difference is that instead of using the hostname and port of the private resource the Tunnel name is specified instead.
Database Connections
Database connections are configured in the Database Connection section of the remote Verj.io On-Premises and Verj.io Service Plan’s Server Admin Application:
- Select the Gateway Pooled Connection Connection Type.
- Select the appropriate Database Type.
- Select the appropriate Gateway.
- Select the appropriate Gateway Tunnel.
- Fill in any more of the URL parameters as appropriate, for example the Database name, in Database Properties.
- Fill in any other connection properties as if you are directly connecting to the Database, for example username and password parameters.
The Database Connection can be tested by pressing the Test Database Connection button.
Gateway Pooled Connections are effectively identical to Pooled Connections, which means they maintain a configurable pool of connections that remain open, are shared between multiple users and are transactional.
LDAP Connections
Connections to LDAP services (e.g. Active Directory) are configured in the Security Properties section of the remote Verj.io On-Premises and Verj.io Service Plan’s Server Admin Application:
- Check the Gateway Connection check box.
- Select the appropriate Gateway.
- Select the appropriate Gateway Tunnel.
- Fill in the other properties as you would for a direct connection to the LDAP Service.
Gateway LDAP connections behave the same way as direct LDAP connections.
There is no need to specify a protocol for Gateway LDAP connections. Unlike a direct connection, the Verj.io Gateway itself is responsible for the actual connection to the LDAP service and this can be a SSL/TLS secured connection if required (in cases where the LDAP service requires a SSL/TLS connection a direct connection would have to use the ldaps protocol).
Email Account Connections
Connections to Email Account Service are configured in the Email Accounts section of the remote Verj.io On-Premises and Verj.io Service Plan’s Server Admin Application:
- Check the Gateway Connection check box.
- Select the appropriate Gateway.
- Select the appropriate Gateway Tunnel.
- Fill in the other properties as you would for a direct connection to the Email Account.
Gateway Email Account connections behave the same way as direct Email Account connections.
There is no need to specify a protocol for Gateway connections. Unlike a direct connection as the Verj.io Gateway itself is responsible for the actual connection to the Email Account and this can be a SSL/TLS secured connection if required (in cases where the Email Account requires a SSL/TLS connection a direct connection would have to use the SSL or TLS over smtp protocol).
Other Resources
Other resources such as REST calls are configured in the Verj.io Studio.
Where a hostname and (optionally) a port number needs to be provided to connect directly to the resource, a Gateway Tunnel variable can be provided instead. This will automatically route the calls to the resource over the Gateway Tunnel from the remote Verj.io Application and to the private resource.
For example a url to a http service would normally take the form http://<hostname/IP>:<port>/... (e.g. http://myserver:4567/...). To use a Gateway Tunnel to access this otherwise private resource, the url should be changed to http://&&{<gateway tunnel variable}/…
All Gateway Tunnels for available to a Verj.io On-Premises environment or Verj.io Service Plan are listed in the Gateway Connections section of their Server Admin Application. When connected to a tunnel its corresponding Gateway Tunnel variable is shown. The variable usually has the form $gwt_gatewayName_tunnelName.
REST Services
As an example, we will look at the two ways you might connect to an otherwise private REST service over a Gateway Tunnel.
In this example, a Verj.io Service Plan has myGateway configured, which securely connects it to a Verj.io Gateway running in the same private network as the REST service. That Verj.io Gateway has restTunnel Gateway Tunnel configured that goes to the server (and port number) of the REST service. The Verj.io Service Plan has connected to restTunnel Tunnel in the Gateway Properties section of the Verj.io Service Plan’s Server Admin Application.
Using a REST Web
Service Resource
The Base URI of the REST Web Service Resource uses the Gateway Tunnel variable instead of the hostname and port of the REST service: http://&&{$gwt_myGateway_restTunnel}/ufs/api/customer.
Other than the Base URI the resource works in the same way as when directly connecting to the REST service.
Using the JavaScript
API
When using the services.rest API to call a REST service the gateway the Gateway Tunnel variable is used instead of the hostname and port of the REST service: services.rest.get(http://&&{$gwt_myGateway_restTunnel}/ufs/api/customer);.
Other than specifying the Gateway Tunnel variable in the URI, the JavaScript API methods are the same as when directly connecting to the REST service.
Security
Gateway Tunnels use the Gateway API Key to verify that they are coming from a trusted Verj.io Application. It is recommended that Verj.io Gateways are configured to only accept SSL/TLS connections.
The optional IP Whitelist can also be used to further restrict the source address a Verj.io Gateway will accept connections from.
Proxy Configuration
Gateway Tunnels make use of WebSocket technology to make them fast and efficient. If an application such as Apache HTTP Server or Microsoft IIS is being used in-front of the Verj.io Gateway and uses an AJP connector to forward requests to the Gateway, then some additional modules and configuration may need to be added to the Apache and IIS servers.