User Authentication OpenID Connect
using ADFS - Step by Step Setup Guide
Installing AD FS server role via the Add roles and features wizard
Installing AD FS server role using Windows Powershell command
Generating Self-signed Certificate
Import the newly created certificate
Verify that Federation Server is operational
Configuring Service Principal Name
Configure AD FS Authentication Methods
Application Group Configuration
Native Application Configuration
OpenID Connect Claims Configuration
Configure OAuth Authentication
Configure OpenID Connect User Authentication
AD FS User Agent Configuration
See also: Server Administration Application Home Page, Open ID Connect Configuration
Introduction
This document guides you through a step by step
process to setup Active Directory Federation Services (AD FS) with Single Sign On (SSO) using OpenID Connect.
The prerequisites for configuring an AD FS server are
as follows:
·
Setup Windows Domain Controller
·
Install and configure Active Directory
At the end of this step by step process you will have
configured the following:
·
AD FS Server – this is the published Active Directory Federation Server
that authorizes user credentials against Active Directory
·
AD FS Web Proxy that allows Single Sign On
(SSO) without prompting for user credentials inside the domain but allows users
to authenticate using their user credentials outside the domain.
·
Browser Configuration for SSO within the Intranet
·
Verj.io Server Configuration to
authenticate all users accessing Verj.io forms using OpenID Connect
The following diagram shows the basic ADFS Setup
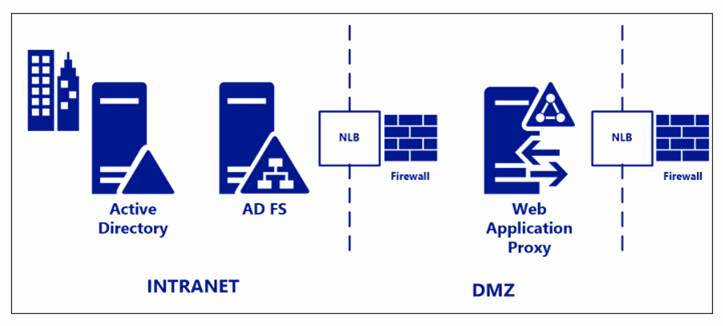
ADFS Server Setup
The ADFS Server it must be added to the domain and have access to Active Directory. You will require membership to Administrators or equivalent as a minimum to complete the following procedure.
The first thing to do is to install the AD FS role service.
Installing
AD FS
There are two ways to install the AD FS role service:
· Using Add roles and features wizard
· Using the Windows Powershell command
Installing AD FS server role via the Add roles and
features wizard
1) Open Server Manager.
To open Server Manager, click Server
Manager on the Start screen, or Server
Manager in the taskbar on the desktop. In the Quick Start tab of the Welcome tile on the Dashboard page, click Add roles and features.
Alternatively, you can click Add
Roles and Features on the Manage menu.
2) On the Before you begin page, click Next.
3) On the Select installation type page,
click Role-based or
Feature-based installation, and then click Next.
4) On the Select destination server page,
click Select a server from the
server pool, verify that the target computer is selected, and
then click Next.
5) On the Select server roles page,
click Active Directory
Federation Services, and then click Next.
6) On the Select features page,
click Next.
The required prerequisites are preselected for you.
You do not have to select any other features.
7) On the Active Directory Federation Service (AD FS) page,
click Next
8) After you verify the
information on the Confirm
installation selections page, click Install.
9) On the Installation progress page,
verify that everything installed correctly, and then click Close.
Installing AD FS server role using Windows Powershell
command
1) Open the Powershell command window
2) Run the following
command:
Install-windowsfeature adfs-federation
–IncludeManagementTools
Configuring
ADFS
Note that before you begin you will need to have an SSL certificate for this server. This can be obtained from a trusted certificate authority through the Microsoft Management Console (MMC) snap-in for IIS.
Alternatively you can generate a self-signed certificate by:
Generating Self-signed Certificate
Note: ADFS is not compatible with CNG (Cryptographic
Next Generation) certificates using the New-SelfsignedCertificate
module, so Microsoft have published New-SelfsignedCertificateEx
module to generate compatible certificates.
1)
Download the New-SelfsignedCertificateEx
2)
Extract the contents of the zip file to c:\temp
3)
Open Windows Powershell command window
4)
Navigate to c:\temp
5)
Import the module by running the following Powershell
command:
Import-Module .\New-SelfsignedCertificateEx.psl
6)
Run
the following Powershell command to generate the
public and private keys for the AD FS server to c:\temp\adfs-server-PubPri.pfx:
New-SelfsignedCertificateEx
-Subject "CN=adfs.server.com" -EKU "Server Authentication",
"Client authentication" -KeyUsage "KeyEncipherment, DigitalSignature"
-AllowSMIME -Path C:\temp\adfs-server-PubPri.pfx
-Password (ConvertTo-SecureString
"password" -AsPlainText -Force) -Exportable
Import
the newly created certificate
1) Run the Microsoft Management Console by running mmc on the Powershell command line
2) Add snap in Certificates
3) Open the tree Console Root à Certificates (Local Computer) à Personal
4) Right click the Personal folder and select Import
5) Click Next on the Welcome Page
6) Select Browse and select the newly created file c:\temp\adfs-server-PubPri.pfx
7) Click Next
8) Type in the password
9) Click Next
10) Place all certificates in the following store: Personal
11) Click Next
12) Click Finish
Export Public Key
Export the public key
for use testing and configuration of the ADFS Proxy (The public key is required
to be imported into the Trusted Root Certificate Authorizations to allow a
trust relationship between the two servers)
1)
Run the Microsoft Management Console by running mmc
on the Powershell command line
2)
Select the newly created certificate in the Personal (Open the tree
Console Root à Certificates (Local Computer) à Personal)
3)
Right click the certificate adfs.server.com and click Export
4)
Do not export the private key. Select Next
5)
Select DER encoded binary X.509
6)
Click Next
7)
Select Browse and navigate to c:\temp and type in the filename adfs-server-Pub.crt
8)
Click Finish
Configuring
AD FS Server Role
1) Within the Server Manager, click and select Configure the federation service on this server
2) Ensure Create the first federation server in a federation server farm is selected and click Next
3) Click on Next
4) Select the SSL Certificate (created/imported) above, provide Federation Service Display Name and click Next
5) On the Specify Service Account page, you can either Create a Group Managed Service Account (gMSA) or Specify an existing gMSA account
6) In order to enable set the KDS Root Key, run the below PowerShell Command on a Domain Controller
Add-KdsRootKey –EffectiveTime (Get-Date).AddHours(-10)
7)
Go back to the ADFS server click Previous and Next
8)
Select Create a Group Managed Service Account, provide a name and click Next
9)
Click on Next
10)
Review Options and click Next
11)
Click on Configure
12)
Click on Close
13)
Create a DNS entry for this AD FS Server on the Domain Controller as created in
the CN above, e.g adfs.server.com
Validation
Verify that the ADSF Services
1)
Open the Event
Viewer and navigate to the ADFS View and search for the Event ID 100
Verify
that Federation Server is operational
1)
To
verify that Internet Information Services (IIS) is configured correctly on the federation
server, log on to a client computer that is in the same forest as the
federation server.
2)
Open a
browser window, in the address bar type the federation server’s DNS host name,
and then append /adfs/fs/federationserverservice.asmx
to it for the new federation server, for
example:https://adfs.server.com/adfs/fs/federationserverservice.asmx
3)
Press
ENTER, and then complete the next procedure on the federation server computer.
If you see the message There is a problem with this website’s security
certificate, click Continue to this website
The expected output is a display of
XML with the service description document. If this page appears, IIS on the
federation server is operational and serving pages successfully.
Configuring Service Principal Name
The Service
Principal Name (SPN) is the name that was defined in the internal DNS for the
ADFS server. In the examples case this is adfs.server.com
It is
important to make sure that the computer itself does not contain the SPN. The
SPN must be against the user account that was defined for the ADFS server
otherwise authentication problems will be experienced.
Computer Level
SPN
1) Check to see if the computer has the SPN defined by executing the
following command:
setspn -L {server name}
This
will show you a list of SPN’s associated with the
server.
Example
setspn -L adfs
Registered ServicePrincipalNames
for CN=adfs,OU=Domain Controllers,DC=SERVER,DC=COM:
HTTP/adfs
ldap/WIN-2J4OIUU4P5L/SERVER
HOST/WIN-2J4OIUU4P5L/SERVER.COM
ldap/WIN-2J4OIUU4P5L/ForestDnsZones.SERVER.COM
HOST/WIN-2J4OIUU4P5L/SERVER
2) Make sure that HTTP/{server-dns-name} does not exist.
If it does, then issue the following command:
setspn
-d HTTP/{server-dns-name} {server-name}
Example
setspn -d HTTP/adfs.server.com adfs
User Level SPN
1) Check to see if the ADFS User
Account has the SPN defined by issuing the following command:
setspn
-L {domain\user}
Example
setspn -L server.com\adfsuser
Result
Registered ServicePrincipalNames
for CN=adfsuser,CN=Users,DC=SERVER,DC=COM:
HTTP/ADFS.DEV.AD
2) If the user does not have the
SPN defined, then set it with the following command:
setspn
-a {SPN identifier} {User identifier}
Example
setspn -a
HTTP/adfs.server.com server.com\adfsuser
Verify SSO
1) Open the Windows Powershell command window
2)
Run the following command
Set-AdfsProperties -EnableIdPInitiatedSignonPage
$true
3) Browse to the ADFS
sign in page for example:https://adfs-server.com/adfs/ls/ipdinitiatedsignon
4)
Click on Sign In
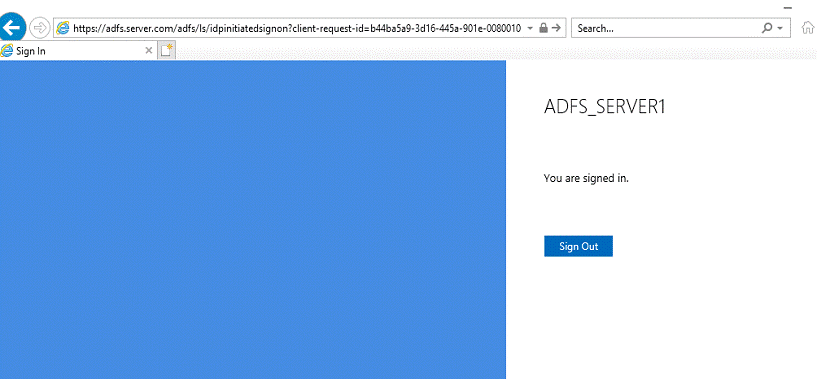
This completes the AD FS server configuration
Configure
AD FS Authentication Methods
It is important to select the types of authentication for the local Intranet and the external Extranet. This will determine how the user will authenticate with the AD FS. Forms authentication (prompt to enter user credentials) will be used when requests are received through the ADFS Proxy server (Extranet) and Windows authentication will be used when requests are received from a user who is logged in to the domain (Intranet).
1) From the Server
Manager Console Tools menu select AD FS Management
2) In the AD FS Management left-hand panel expand Service
and select Authentication Methods
3) In the right-hand panel edit the primary
authentication method
4) Tick Forms Authentication checkbox in the Extranet
5) Tick the Windows Authentication checkbox in the
Intranet.
6) Apply the change and
click OK
Application Group
Configuration
The
Application Group defines how an application can communicate with Active
Directory information to a calling service plan application. You can have one
or more Application Groups each tied to their own service plan or servicing
multiple service plan from one Application Group.
Each
Application Group generates a unique
Native
Application Configuration
1) From the Server Manager Console Tools menu select AD FS Management
2) Right click the Application Groups and select Add Application Group.
3) Enter an application Name.
4) Select Native Application and click Next
5) Take a note of the Client ID as this will be used in the OAuth configuration on the Verj.io server
6) Enter the Redirect URI (Verj.io server callback/return URL) . The URI is used to redirect the user back their web application after the user has authenticated their user credentials. This URI must be valid URI.
The Verj.io server return URL should be in the format of: http(s)://<servername>/<webappname>/ufsreturn
Example
https://my-webapp.server.com/ebase/ufsreturn
7) Click Add.
8) Click Next
9) Apply and click OK
Web Application Configuration
1) From the Server Manager Console Tools menu select AD FS Management
2) Click on the Application Groups and double click the Application Group in the right hand panel that was created in the Native Application Configuration section
3) Click Add Application
4) Select Web API and click Next
5) Enter the Relaying party identifier is the identifier of the native application, i.e the Client ID configured in the Native Application Configuration.
6) Click Next
7) Select the Access Control Policy in the upper panel sets that policy as the active policy. You can only select one
8) Click Next
9) On the Configure Application Permissions, tick the openid checkbox
10) Click Next
11) Click Next
12) Apply and click OK
OpenID Connect Claims
Configuration
A Claim is an Activity Directory property that can be returned to the calling web application contained within the OpenID Connect JSON Web Token (JWT).
Issuance Transform Rules
Add claims to your Application Group by
adding one or more rules to the Issuance Transform Rules of the Web
Application.
1)
From the Server Manager Console Tools menu select AD FS Management
2)
Click on the Application Groups and double click the Application Group in the right hand
panel that was created in the Native Application Configuration section
3)
Double click the Web API application configured in the Web Application Configuration
section.
4)
Select the Issuance Transform Rules tab
5)
Click Add Rule
6)
Select Send LDAP Attributes as Claims
7)
Click Next
8)
Enter a Claim rule name for the rule
9)
Select Active Directory as the Attribute store
10)
Select the LDAP Attributes and Outgoing Claim Type. Note: If the
LDAP attribute is not listed then it can be edited directly. The claim type can
also be manually entered.
Example Claim Configuration
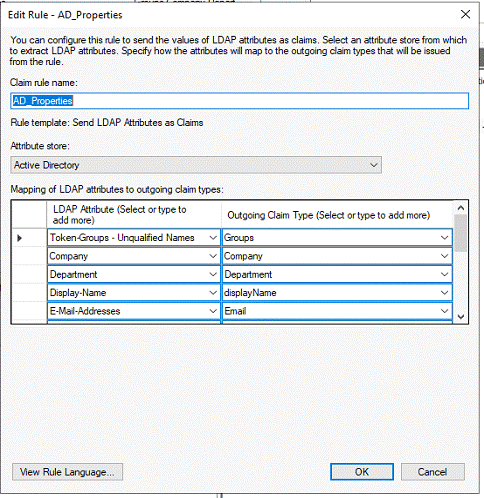
11) Click OK
12)
Apply and then click OK
13)
Click OK
Setup ADFS Web Proxy
The ADFS Web Proxy should be installed on a separate server than the ADFS Server. This server should be outside the internal firewall and lives inside the DMZ.
Install
ADFS Web Proxy
1) On the server where you plan to
install the Web Application Proxy, open Server Manager and
start the Add Roles and Features Wizard.
2) Click Next on
the first and second pages of the wizard.
3) On the Server Selection page,
select your server, and then click Next.
4) On the Server Role page,
select the Remote Access role, and then click Next.
5) On the Features page and Remote
Access page, click Next.
6) On the Role Services page,
select Web Application Proxy, click Add Features, and
then click Next.
7) On the Confirm
installation selections page, click Install.
Configure ADFS Web Proxy
1) Copy the exported certificate from the ADFS server that was created on the AD FS server on to the AD FS Web Proxy server and import into the Personal directory. See importing certificate
2) On the Server Manager Dashboard, you will see a warning icon to the right of the flag symbol. Click this icon to gain access to the Web Application Proxy Wizard. This wizard will walk you through the configuration process.
3) Enter the DNS name of the ADFS server e.g: adfs.server.com then enter user credentials of an ADFS server user that had administrative privileges.
4) Click Next
5) Select the certificate you imported/copied from the ADFS server.
6) Click Next
7) On the Confirmation Page, Click Next
8) When the configuration is complete you will be taken to the Web Application Publishing system. Close this system as a trust relationship has already be created with the ADFS server under the covers.
Validate
AD FS Web Proxy
1) From the Server Manager Dashboard open the Tools menu and select Remote Access Management to check that the proxy server is running OK.
Create a public DNS Entry
For the AD FS Proxy to work you must create a public DNS entry for the AD FS server but it must point to the AD FS Proxy Server. The name of this entry must match exactly the internal DNS name of the ADFS server.
One option is to create a domain name for the public facing ADFS server but point it’s a record to the ADFS Proxy server.
The ADFS Proxy server/service uses the name to access the backend ADFS server.
So, for example, if the internal DNS name for the ADFS server is adfs.server.com and it points to an internal IP address 192.168.132.10 then the public facing name must also be adfs.server.com but it must point to the public IP address of the ADFS Proxy server i.e: 80.23.17.26.
Browser Configuration
The browser must be configured to enable Single Sign On (SSO) from without being prompted to login using windows authentication. SSO will only work when you are logged into the domain, otherwise you will be prompted to supply the user credentials. The following section gives instructions on how to use integrated windows authentication to allow credentials to be passed along with its requests.
Microsoft
Edge
Unlike Internet Explorer, Edge does not
have an internet options settings page, rather it uses
the internet options of the windows operating system. To modify these settings:
1) Type in internet options into the Windows search box search box
3) Select the Local Intranet icon
4) Click Sites button
5) Ensure that the following three options are checked:
Include all local (intranet) sites not listed in the other zones
Include all sites that bypass the proxy server
Include all network paths (UNCs)
6) Click Advanced button
7) Type in the URL of the AD FS server as a trusted site
8) Click Add
9) Click Close
10) Click Customize button
11) Scroll to the bottom User AuthenticationàLogon and select Automatic logon with current user name and password
12) Click OK
13) Click on the Advanced tab
14) Scroll down to the Security section and tick the checkbox Enable Integrated Windows Authentication *
15) Click OK
Internet Explorer
By default Internet Explorer comes with windows
authentication enabled.
Internet Explorer requires the following security
configuration for SSO
1)
Open internet explorer and then settings > internet options
2) Follow the configuration instructions for Microsoft Edge above
Google
Chrome
Ensure that you have
configured Internet Explorer browser settings before configuring Chrome
1) Open the Chrome settings
page
2) Select Import bookmarks
and settings
3) Select Internet Explorer
4) Select all options
5) Click Import
Firefox
To enable windows authentication in Firefox
carry out the following steps
1) Open Firefox
2) Type in about:config into the address URL
3) Click Accept the risk
4) In the search bar type network.automatic
5) Change network.automatic-ntlm-auth.allow-proxies
make it equal to true
6) Enter the domain name of the AD FS
server into network.automatic-ntlm-auth.trusted-uris
Example
network.automatic-ntlm-auth.trusted-uris =
adfs.server.com
Verj.io Configuration
To enable OpenID Connect on
the Verj.io sever you will need to configure the
following:
·
OAuth Configuration
·
Open ID Connect User Authentication
You will also need some of authorization URLs from the AD FS the configuration. These URLs can be found by typing in the following URL into a browser:
http://<adfs-name>/adfs/.well-known/openid-configuration
Example
http://adfs.server.com/adfs/.well-known/openid-configuration
Result
The following URLs from the response are required to configure the Verj.io Server OpenID Connect User Authentication:
{
…
"authorization_endpoint":
"https://adfs.server.com/adfs/oauth2/authorize/",
"token_endpoint": "https://adfs.server.com/adfs/oauth2/token/",
"jwks_uri":
"https://adfs.server.com/adfs/discovery/keys",
…
}
You will also need the Client ID that was generated when configuring the AD FS Native Application
This section assumes that the Verj.io Server is configured and running.
Configure OAuth Authentication
1)
Open
the Server Administration Console by typing in the URL:
http(s)://<server-name>:<port>/<webapp-name>/ebaseAdmin.eb
Example
https://portal.mycorp.com/ebase/ebaseAdmin.eb
2) Login the Server Administration Console if prompted. Note that the user must have administration privileges.
3) Click on OAuth Configuration link
4) Click ![]() button
button
5) Enter the OAuth Name
6) Optionally enter a Description
7) Select Authorization Type option Authorization Code
8) Enter the Authorization URL
returned from the openid-configuration JSON authorization_endpoint value
Example
https://adfs.server.com/adfs/oauth2/authorize/
9) Enter the Token request URL
returned from the openid-configuration JSON token_endpoint value
Example
https://adfs.server.com/adfs/oauth2/token/
10) Enter the Client id that was
generated when configuring the AD
FS Native Application
Example
ecb01669-ffe8-4002-8aea-b29a32e439aa
11) Leave the Secret key blank as AD FS does not require this unless configured
12) Select Send Access Token as option Header
13) Enter Scope required. For OpenID connect the scope, must include the word opened
Example
openid profile roles
14)
The
Redirect URI is read only and should match that configured when
configuring the AD FS Native
Application. If the AD FS Native Application Return URI does not
match this then edit the Native Application to add this URI
Example
https://portal.mycorp.com/ebase/ufsreturn
15) Click OK
Configure
OpenID Connect User
Authentication
This section enables OpenID Connect User Authentication for all new users when access Verj.io forms.
1) Open
the Server Administration Console by typing in the URL:
http(s)://<server-name>:<port>/<webapp-name>/ebaseAdmin.eb
Example
https://portal.mycorp.com/ebase/ebaseAdmin.eb
2) Login the Server Administration Console if prompted. Note that the user must have administration privileges.
3) Click on User Authentication link
4) Tick Use Open ID Connect checkbox
5) Click ![]() icon to expand the
Open ID Connect options if they have did not automatically
icon to expand the
Open ID Connect options if they have did not automatically
6) Click ![]() button
button
7) Enter Name for the Open ID Connect connection
8) Select the OAuth Name that was configured in the OAuth Configuration.
9) Enter Scope if you wish to override the OAuth Scope. The default is setting is filled in as openid
10) Enter the Public Keys URL returned from
the openid-configuration JSON jwks_uri value
Example
https://adfs.server.com/adfs/discovery/keys
11) Enter Claim name containing the userid. This is the JWT claim name that will be used for the Verj.io userid e.g Email
12) Optionally enter Claim name containing user roles. This is the JWT claim name that contains a list of roles e.g Groups
13) Tick the Automatically populate user credentials from claims checkbox if you would like the OpenID Connect login to populate the user credentials from the claims in the JWT
14) Tick Store Refresh Token Cookie checkbox if you would OAuth refresh token to be stored as a session cookie. This is useful if you do not want to login using the OAuth user credentials form over the extranet
15) Click OK
Other Configuration
Customizing
the sign-in page
It is possible to customize the sign-in page that is presented to users outside of the domain.
1) Open a Microsoft PowerShell Window
2) To set the company logo on the default sign-in page run the command:
Set-AdfsWebTheme -TargetName default -Logo @{path="<absolute-filename-path>"}
Example
Set-AdfsWebTheme -TargetName default -Logo @{path="c:\Verjio\UserData\images\logo_light.png"}
3) To set the company name into the default login-in page run the command:
Set-AdfsGlobalWebContent
–CompanyName "<company-name>"
Example
Set-AdfsGlobalWebContent –CompanyName "My Corp"
4) To change the background image, it is recommended that the dimensions for the illustration to 1420x1080 pixels @ 96 DPI with a file size of no greater than 200 KB. Run the command:
Set-AdfsWebTheme
-TargetName default -Illustration @{path="<absolute-filename-path>"}
Example
Set-AdfsWebTheme -TargetName default -Illustration @{path="
c:\Verjio\UserData\images\company_logo.jpg"}
4) To set a description on the sign-in page run the command:
Set-AdfsGlobalWebContent -SignInPageDescriptionText
"<login-credentials-description-text>"
Example
Set-AdfsGlobalWebContent -SignInPageDescriptionText "Access to this system requires your domain credentials"
Click here for a full list of available options configuration
options.
AD
FS User Agent
Configuration
By default, the AD FS server only allows internet explorer to post requests.
To enable Edge, Firefox and Chrome
logon to the ADFS server:
1) Open a Microsoft PowerShell Window
2) Run the following command:
Set-AdfsProperties
-WIASupportedUserAgents @("<user-agent-string1>",
"<user-agent-string2>"…)
Example
Set-AdfsProperties -WIASupportedUserAgents
@("MSAuthHost/1.0/In-Domain", "MSIE 6.0", "MSIE
7.0", "MSIE 8.0", "MSIE 9.0", "MSIE 10.0",
"Trident/7.0", "MSIPC", "Windows Rights Management
Client", "Mozilla/5.0", "Edge/12")
3)
To verify
the user agents run the following command
Get-ADFSProperties
| Select -ExpandProperty WIASupportedUserAgents
Example Result:
MSAuthHost/1.0/In-Domain
MSIE 6.0
MSIE 7.0
MSIE 8.0
MSIE 9.0
MSIE 10.0
Trident/7.0
MSIPC Windows Rights Management
Client Mozilla/5.0
Edge/12